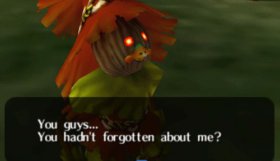

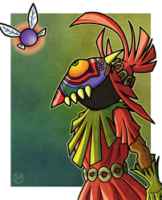
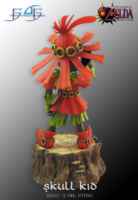
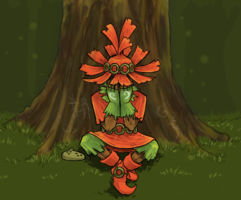
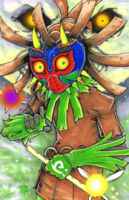
This one isn't simply clothes, it's something super strange and new. Let's take a look:
The main body of the hat is a half-egg shape worn mostly over the back of the head, resting diagonally when seen from the side. There's no straps or strings but that doesn't mean you can't add them.
Coming out from the brim of the dome is over a dozen thick strips of the same material. These flaps seem to stick out in straight radial lines, sometimes flopping down, sometimes flopping upwards. Spewing from the top of the the dome is a few loose flaps of the same material. In the game, it seems like the hat may have originally had a complete brim but it got frayed.
Strapped around the circumference of the dome is a belt of wooden or metal rings tied together with string. These are similar to the rings that make up Skull Kid's belt, and they could be the same if you want.
This hat could be made out of any kind of material: sacking, hessian, cloth, felt, even straw or leaves. Skull Kid probably made it himself using what he could find in the forest. It's possible he got a large number of thin strips and bound them all together, with the tips all coming together out the top to form the crest. Heaven knows how he'd get that to hold. Magic, probably!
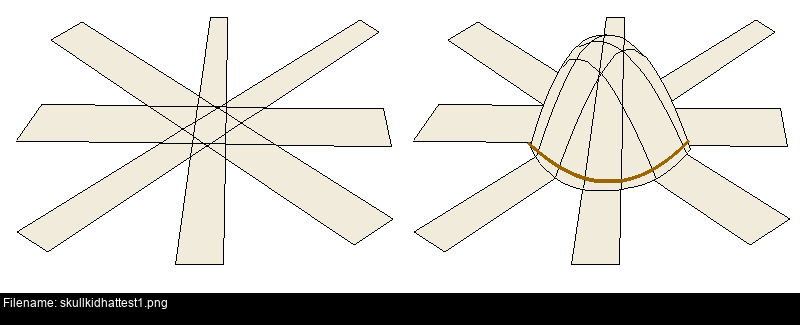
You'll have to decide whether you want to go for dark or light colours, thin or thick strips, and what you're going to do about the crest. I've seen paper, cardboard, fabric. I used a big bolt of mustard coloured felt I got from Abakhan. Quite thick, but nice and strong and a great colour.
First thing I did is measure my head, trying to gauge the size of the circumference of the hat, taking into account where it would lie on my head. I'd also need to decide what height the top of the dome would have to be.
The hat has to be angled backwards quite a bit since the Majora's Mask is going to be right up against your face, blocking a lot of the space directly in front of you.

Once you've got some basic measurements you can make some prototypes to see how they fit. And here's one I stapled together previously. Stupid? Dangerous? Sure, but also practical. Ask an adult to stop you.
This prototype was based on a cone of the required circumference and a guessed height from the cone base. Once you've got something like that that fits you can have a more informed guess at a better pattern for the hat.
For example, if you start off with a Pac-Man shape with a radius equal to the height and an outer length equal to the circumference you want for the hat, you can sew his lips together to form a cone. However, Skull Kid's hat is a dome, which isn't so easy!
To make a dome, there's all kinds of fancy methods involving spirals and curved darts you can use. No thanks...
I sketched out a simple pattern that used three identical arch shapes to form a dome:
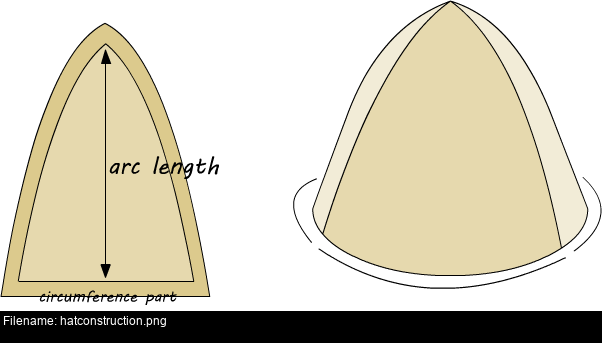
If you divide the circumference by three, you get the length of the arch base. Estimating the length of the curved part of the hat gives you the arch height. Don't forget to add seam allowance.
This is the basis of the hat: there will be three identical pieces based on this arch shape, each with three spokes embedded within them. Once those pieces have been individually constructed, they can be sewn together to form the complete hat.
The hat looks pretty strange there because I only pinned it roughly instead of sewing it together.
For each arch piece, we need to put the spokes in and secure them safely, preferably hiding as much of the stitching as possible, as well as giving us enough room at the sides to complete the hat.
To hide the stitching, the hat dome is going to have two layers to it: Each arch is going to be made of two arch-shaped layers of felt. The inner layer is going to be attached to the spokes and have all kinds of complicated stuff going on. The outer layer is going to be the outer surface of the hat, and hopefully will have as little visible stitching as possible.
In my design, each of the arch pieces has three spokes extending outwards from it. The base width of the spokes is based on the arch base length divided by three. Not all the spokes are the same width. Making all the spokes the same width would look a little artificial (as well as being too much effort). I made a whole bunch of spokes and used whichever looked the nicest and fit into the space.
Each spoke is almost rectangular, a little wider at their tip than at the base (at the hat). They're each constructed from two layers of felt with a layer of stiff buckram between to keep the spoke as planar as possible. Without the buckram, the felt would crinkle and twist about instead of staying rigid.
Looking back at the reference pics, the hat spokes are incredibly rigid, curling and twisting about in mid-air without any support. To keep the spokes suitably cartoony, I sewed some DIY garden wire inside the spokes beside the buckram. This makes the spokes flat and poseable. They can be bent in any direction and maintain their shape!
If you look at one of my completed spokes from above you can see the two tracks of stitching, forming a channel for the wire to live in. The innermost track holds the buckram in place, making a sandwich of the three layers, and the outermost track completes the channel holding the wire in place. When the felt is trimmed close to the outermost seam, the result looks a pleasant combination of hand-made, haphazard yet definitely-designed.
To make a spoke:
Measure out the thickness and length of the spoke onto the buckram. On my notes I've written that the buckram should be 22 inches long by 3 inches on the interior side and 4 inches on the exterior side. The spoke will have a length extending outwards from the dome of the hat, and a shorter length that will be sewn into the arch. Measuring the spokes in the completed hat, I've found that I tried to make each of them extend 18 inches out of the brim and have 4 1/2 inches inside. That doesn't add up to 22, so you're going to have to do some experimentation!
Prepare two large pieces of felt, each large enough to completely cover the buckram base.
Lay the buckram in the centre of the felt, with the shorter edge exposed by one inch.
The felt will stay in place against the buckram better if you use some double-sided tape. I left this tape inside the spoke, hoping it'll prevent the layers peeling apart during or after sewing.
Sew the interior seam of the spoke, sewing all three layers together. This seam should lie a few millimetres inwards from the buckram and go around all three outer edges of the spoke.
Now that you have the central body of the spoke, you can insert and seal the structural wire inside by doing the following for each side:
Measure, cut and fit a long piece of wire. This wire should extend from the free edge of the felt (the edge that will reside inside the dome of the hat) all the way to the end of the buckram, and then bend 90 degrees inwards and lie across the long edge of the spoke towards the centre of the felt, forming a long L shape.
When you have the wire cut and bent, tuck it into the small nook you've created beside the interior seam between the buckram and the top layer of felt. Use several strips of masking tape along its length to keep it steady. The masking tape might mangle the surface of the felt when you remove it if you buy a good brand that has some adhesion - you might have better results with really cheap stuff! Be careful.
When the wire is tucked away, sew the exterior seam to seal the wire inside the spoke. Be very careful during this step as you'll be sewing within millimetres of a very solid wire that will spell very bad news if it you hit it.
Repeat the steps for the other side.
Now you should have a slab of felt and buckram with a rectangular pair of seams around three sides with wire sealed inside.
Here's a diagram, though in retrospect it might confuse more than it enlightens.
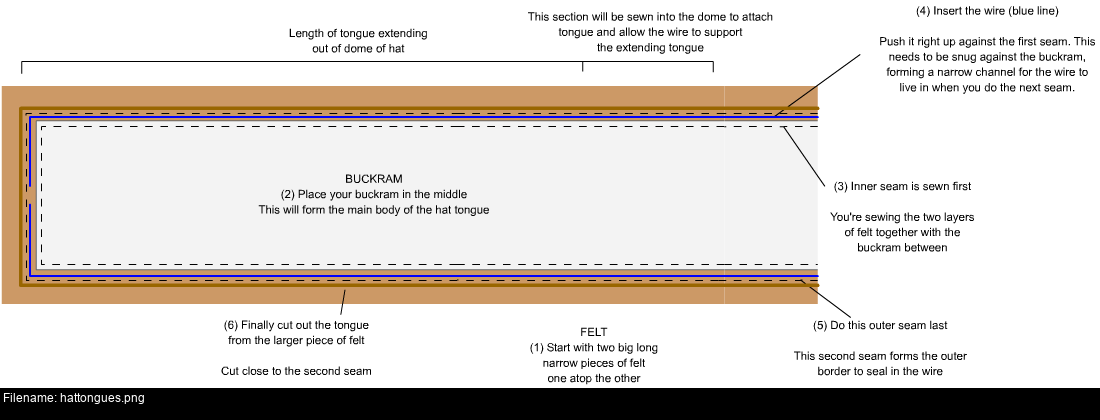
But it's at least neater than the notes I wrote at the time. :)
Notice that in the second image the spoke appears to taper off towards the outside edge. This is wrong ! The spokes should should become wider as they extend away from the hat.
Here's the ten spokes I made. With the kink added to show how they'd lie within the hat, you can see the method to the madness. I've plopped my paper cone template on top to test and, satisfied with that, I coiled some of the felt to see if it'd look reasonable in colour.
Now that all the spokes are available, I could choose the sets of three that I would want to lie across the edge of each arch piece. It's not entirely clear from these pictures, but I arranged the spokes so that larger ones would be clustered together. This would give the finished hat a definite 'front' and 'back' based on whether the thicker or thinner spokes were facing towards you, though the jury's out on which is which!
Constructing the complete arch pieces from the spokes and the arch shaped felt is an intricate task! If you get the order mixed up, it's possible to end up pretty snookered. There's a lot of layers at work here: you'll have to monitor your machine's tension since you could be sewing through four layers of felt and one piece of buckram. If you hit the wire as well, you lose.
First, sew the straight hem along the bottom the felt piece you'll use for the inner part of this arch section. This hem will become the brim of the main dome of the hat.
Lay out the three spokes you've selected for this arch section onto one of the felt pieces. This'll help you get the sizing and layout right. Use double sided tape again if you like to stop things sliding around. With all the layers involved, pinning most likely won't be possible. It might help to pencil in markings at this point and take lots of pictures.
Pay attention to the angle that the spokes emerge from the brim. The central spoke should emerge straight, but the ones either side could be angled very slightly outwards. Try to visualise the direction they will face when the complete hat is constructed.
To secure a spoke to the lower arch felt piece, start with a stitch parallel to the brim. Use the interior stitch as a guide to ensure you don't accidentally collide with the hidden wire. When you're satisfied with the placement of your spoke, continue the straight stitch in a small rectangle within the buckram area of the spoke. I then secure it further with an X from corner to corner.
Perform those steps for the remaining two spokes and you'll have a near complete arch piece.
Each hat piece has two arch shaped felt pieces. Once all the spokes are in place, the outer piece needs to be sewn over the top. The outer piece needs to lie perfectly on top of its cousin. Prepare this new face by sew the base hem first. Then lay it so that the two hems are face to face. This needs to be attached directly on top of the inner layer piece, sewn parallel to the brim across the three buckram centres of the spokes.
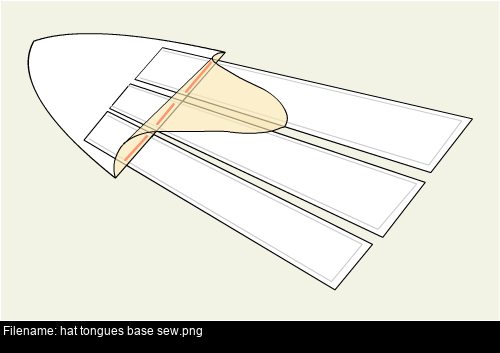
There's no need to sew at the sides of the spokes as this is the seam allowance for attaching the left and right adjacent arch pieces.
Looking at this image now, I've just realised that there's no reason to get the arch shape perfect at the start. If you've got sufficient material free outside the minimum arch area, you can trim your arches to the correct size at this point, which will ensure the top and bottom layers have exactly the same shape.
If you complete all those steps for the three hat arch pieces and you should see how the final hat is constructed. The final seams are those that connect the three arch pieces together.
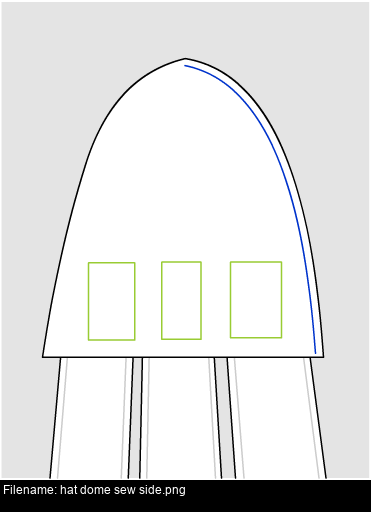
To complete the main hat body, lay two of these completed pieces flat on top of each other with the spoke-stitched faces facing outwards. You need to sew along one of the curves at the side of the two arch pieces, through all four layers of felt. This way, when you invert the hat, you have the exterior of the hat completely unblemished by stitching, and the interior of the hat all nicely lined and complete.
Do this for all three seams, folding the arch piece in half vertically to fit it all in the machine if you have to.
Kiboom! One Skull Kid hat all sewn up and ready! But... what about the rings?
These things go under many different names: curtain rings, bangles, wooden jewellery, and so on. I looked on eBay, local shops, second hand, pound shops, DIY shops I found these guys eventually on AliExpress by looking under the unambitious name 'wooden circle'.
Before you order from AliExpress, be aware that sizes, colours, finishes and materials may vary wildly from what you see. And it'll take weeks from ordering for the iem to reach you. It's a crap shoot, with a very very long chute and you might end up with... something unusable. Good luck!
I ended up with these rather nice curtain rings, lovely colour, varnished and ready to use. In most pictures, Skull Kid's hat rings are a mustard colour looking light against a darker orange hat.
I looked around for some brown garden string to tie the rings together, but I couldn't find anything like that. I could find all kinds of white twine, for gardens and for posting and so on, but I didn't think that dying that darker would be a good idea in case it rubbed off on the hat (it's basically all fluff now) or the rings themselves.
In the end I went for wool since it was cheap. If it's good enough to knit into clothing, it'll be strong enough to hold some wooden rings together for a little while, right?
The rings for the hat form a complete belt just above the brim. You need to measure the circumference of the hat where you want to position your ring belt, and divide this by the full diameter of your rings to get an estimate of how many rings you're going to need to combine together.
Don't try to attach the rings to the hat until you've made the complete belt, or the winding process can become even more tedious than it already is. As you attach each ring to the belt, hold it up to your hat to check how it lies. Measuring is important to start, but since the rings are flat objects you're not making a circle you're making a polygon so the lengths won't match up, and there'll be small amounts of give in your string and so on. Test everything!
There might be a knack for tying wool onto curtain rings firmly, but I don't know if I've quite gotten it yet.
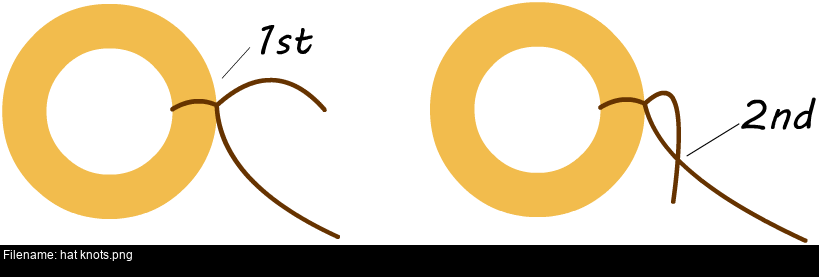
Cut about 4 metres of wool to use.
Wind this wool around a spare cotton spool small enough to pass through a ring.
Loop the free end of the wool around a ring, then tie a basic knot like you're tying shoelaces. Tug this knot tight.
Carefully tie a second knot like this, using a needle to coerce it down towards the first knot so they're on top of each other. This should secure the first knot in place.

Pass the spool through the opposite ring to start to bind the rings together. Pass the spool through the ring, around the back then towards you, then through the opposite ring. Create a figure-8 between the two rings, moving steadily upwards. As you go, gradually tug the loops tighter to form a dense mesh.
When you've constructed at least an inch thickness of dense mesh, it's time to create secure the final knot.
Repeat the steps to create the initial knot to make a knot then secure it.
Trim the loose ends of wool outside the knots.
To attach the ring belt to the hat, I sewed it on. There should be a few areas along the circumference of the hat where there's no interfacing to sew through. Find at least three of these areas around the hat, and secure the ring belt to the hat with a generous amount of stitching.
Prepare a long (2m + ) thread.
Thread it through.
Tie it off inside discreetly.
Loop over the ring, the hat material, over the ring again. Pick your stitch locations so that your new thread is as neat as it can be, and suits the style of the string you've chosen.
Tie it off inside discreetly again.
That's the main structure of the hat! But what about those flaps of material coming out the top?
Some folks use a cardboard cut-out in the shape of the crest, covered in the hat material and attached to the top of the hat. Others use a cluster of loose flaps of the material instead.
I decided to use a few feathers! :) These are listed on eBay as "10''-12'' LONG OSTRICH FEATHERS, PACKS of 1 5 10 BEAUTIFUL COLOURS".
To fix the feathers in place, I decided to hot glue their stalks to a large spare button inside the hat to give it a firm base. That is, I inserted each feather into the top of the hat where all the arches meet, flipped the hat inside out, then carefully attached the feather to the button with hot glue and held it until it was cool. This prevents the feathers from getting knocked around, from falling to one side, or from being pulled upwards out of the hat.
But first! Test it! You've got to make sure your glue and your button are compatible before risking the hat you've spent hours making.
Don't try to put the feather into the hat after hot-gluing, there's no way you're going to get all those barbs through the nexus at the top of the hat without mangling something.
Kaboom, finished Skull Kid hat!
Now that I've made it I had to figure out how the devil I was going to wear it. I can't see through the mask, so I can't get the hat even on my head after putting the mask on. And since the mask is a lot easier to wear if I never unfasten the velcro strap and slip it on like elastic, I'm in a pickle.
I can't see through the mask either, so I'd be taking the mask and hat off and on for every picture anyway...
My solution was to put on the mask myself first and then ask others to put the hat on for me! I figured folks would enjoy being able to fiddle with the costume a little bit, and it all worked out! As a result, the hat looks slightly different every time somebody puts it on me!
These pictures were taken just before I wore it for the first time at MCM Manchester 2016. I've opened it up overnight to air it out and hopefully get the spokes naturally resting in this slightly curled position.
I store it in a black bag, with all the tongues curled up towards the top of the dome like a dead spider. It's not the best, but it's carryable and packable. Whenever I move it I have to make sure not to crush or bend the feather at the top. If it gets ruined through wear, I can snip it off and hot-glue another feather in its place, which is useful.
Here's a funny story:
I bought iron-on adhesive buckram for my spokes, thinking I would iron it to the felt first before sewing. A few ironing tests later, and I found that not a lot will stick to fluffy felt! So I decided to just sew it together instead. This was a major mistake. Well that's not exactly true: the hat ended up exactly as I'd planned it but it wasn't without consequences. If you try to sew through iron-on adhesive fabrics, the motions of the machine will heat everything up as you sew, you'll end up goopy fabrics, goopy needles and a goopy work area. And if you hit a wire, that'll be it for your needle at the very least, and it'll most likely completely upset the timing of your machine.
I have no illusions that the reason I had to replace my first machine was because of this disaster-zone.
There are better ways!
But perfect is the enemy of good, tomorrow is the enemy of today, and all the rest.
During Play Expo Manchester 2016, something really bizarre happened. One of the rings on the hat belt snapped in half suddenly.
I don't know how that could've happened - the hat isn't particularly tight on my head when I wear it and the rings sag a little bit, dangling from their threads where I've sewn them onto the hat. Yet one of them just popped, leaving a couple of half rings flapping freely.
It's only because of a super cool cosplay gal's much appreciated help that I got some wire to tie up the loose rings temporarily for the remainder of the show. One bonus of the hat being the same all the way around is that I could spin it around so that the damage was out of shot! (Or rather, ask anybody who took a picture to spin it!)
To repair it, I cut off all the suspect ring links and rethreaded them. The ring that had snapped was one of those sewn to the hat, but the sewing wasn't particularly tight. I think the lesson here is that you should be prepared for any thing to go wrong, explicable or inexplicable!
And if you're going to make something, you've got to be ready to repair it. If it's irreparable, one good smack and you're back to making the whole thing from scratch.
Written by Matt Carr! mrdictionary.net nonsense.
Questions? E-mail 'em to me, skullkid@mrdictionary.net!
Twitter @SkullKidUK - Facebook facebook.com/mask.smith.cosplay